Selasa, 17 Februari 2009

Setting Mikrotik Wireless Bridge

Sering kali, kita ingin menggunakan Mikrotik Wireless untuk solusi point to point dengan mode jaringan bridge (bukan routing). Namun, Mikrotik RouterOS sendiri didesain bekerja dengan sangat baik pada mode routing. Kita perlu melakukan beberapa hal supaya link wireless kita bisa bekerja untuk mode bridge.

Mode bridge memungkinkan network yang satu tergabung dengan network di sisi satunya secara transparan, tanpa perlu melalui routing, sehingga mesin yang ada di network yang satu bisa memiliki IP Address yang berada dalam 1 subnet yang sama dengan sisi lainnya.

Namun, jika jaringan wireless kita sudah cukup besar, mode bridge ini akan membuat traffic wireless meningkat, mengingat akan ada banyak traffic broadcast dari network yang satu ke network lainnya. Untuk jaringan yang sudah cukup besar, saya menyarankan penggunaan mode routing.

Berikut ini adalah diagram network yang akan kita set.


Konfigurasi Pada Access Point

1. Buatlah sebuah interface bridge yang baru, berilah nama bridge1


2. Masukkan ethernet ke dalam interface bridge


3. Masukkan IP Address pada interface bridge1

4. Selanjutnya adalah setting wireless interface. Kliklah pada menu Wireless (1), pilihlah tab interface (2) lalu double click pada nama interface wireless yang akan digunakan (3). Pilihlah mode AP-bridge (4), tentukanlah ssid (5), band 2.4GHz-B/G (6), dan frekuensi yang akan digunakan (7). Jangan lupa mengaktifkan default authenticated (8) dan default forward (9). Lalu aktifkankanlah interface wireless (10) dan klik OK (11).


5. Berikutnya adalah konfigurasi WDS pada wireless interface yang digunakan. Bukalah kembali konfigurasi wireless seperti langkah di atas, pilihlah tab WDS (1). Tentukanlah WDS Mode dynamic (2) dan pilihlah bridge interface untuk WDS ini (3). Lalu tekan tombol OK.

6. Langkah selanjutnya adalah menambahkan virtual interface WDS. Tambahkan interface WDS baru seperti pada gambar, lalu pilihlah interface wireless yang kita gunakan untuk WDS ini. Lalu tekan OK.

7. Jika WDS telah ditambahkan, maka akan tampak interface WDS baru seperti pada gambar di bawah.


Konfigurasi pada Wireless Station

Konfigurasi pada wireless station hampir sama dengan langkah-langkah di atas, kecuali pada langkah memasukkan IP Address dan konfigurasi wirelessnya. Pada konfigurasi station, mode yang digunakan adalah station-wds, frekuensi tidak perlu ditentukan, namun harus menentukan scan-list di mana frekuensi pada access point masuk dalam scan list ini. Misalnya pada access point kita menentukan frekuensi 2412, maka tuliskanlah scan-list 2400-2500.


Pengecekan link

Jika link wireless yang kita buat sudah bekerja dengan baik, maka pada menu wireless, akan muncul status R (lihat gambar di bawah).


Selain itu, mac-address dari wireless yang terkoneksi juga bisa dilihat pada jendela registration (lihat gambar di bawah).


Konfigurasi keamanan jaringan wireless

Pada Mikrotik, cara paling mudah untuk menjaga keamanan jaringan adalah dengan mendaftarkan mac-address wireless pasangan pada access list. Hal ini harus dilakukan pada sisi access point maupun pada sisi client. Jika penginputan access-list telah dilakukan, maka matikanlah fitur default authenticated pada wireless, maka wireless lain yang mac addressnya tidak terdaftar tidak akan bisa terkoneksi ke jaringan kita.

Jika kita menginginkan fitur keamanan yang lebih baik, kita juga bisa menggunakan enkripsi baik WEP maupun WPA.

Setting Up a Secure Wireless Network

Understanding the Basics

If you're thinking about building a wireless network for your home or office, it pays to do a little planning to ensuree you implement it as securely as possible. Remember how you listened to your next-door neighbor's conversation with her mother-in-law about what happened at last year's 4th of July party on your baby monitor? Like all radio frequencies, anyone with a receiver can tune into a wireless channel, so you need to take extra precautions to prevent to your big-eared neighbor and cybercriminals from listening in.

The primary reason for building a wireless LAN (WLAN) is for increased mobility — so you can move around from room to room without being tethered to a network jack. Another reason people like wireless LANs is because they can network their computers together without having to snake wires through their walls. Since you don't have to deal with the wires, in some regards building a wireless LAN is actually easier than you might think.

Have questions about wireless? Start a thread in the new Intranet Journal Discussion Forum

There are all different kinds of wireless protocols used for different types of wireless networks, but if you want to build a WLAN for your home or office the type of protocol you'll want to use is called 802.11b. When you build a wireless network, you are basically setting up a transmitter called an access point that has an antenna on one side and a wire on the other. The wire plugs into a typical wired connection — an Ethernet, a DSL line, cable connection, or dial-up modem. The antenna talks to the wireless network interface card on your computer, sending network traffic from your laptop to an access point. If it sounds confusing, think of your cordless phone. On one end your cordless phone plugs into a wire, while at the same time the antenna on the hand-held receiver transmits to the base station where the wire is plugged in.

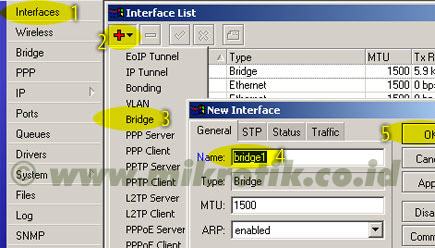
Set Up Your Access Point

One of the first things you'll need to do is setup a wireless access point (AP). If you're setting up your wireless network for a business, you'll want to use a more fully featured high-end AP like a Cisco Aironet 350 Series access point. If you're setting up an access point for a home network, a low-end access point such as a Linksys WAP 11 or an Apple AirPort will suffice. Any access point worth its salt has a TCP/IP interface whether you are setting it up for your home or office, which is something to keep in mind when making your purchasing decisions.

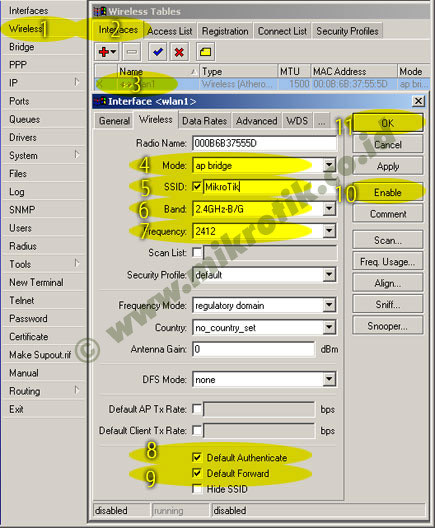
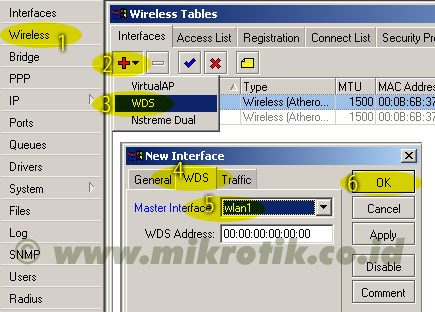
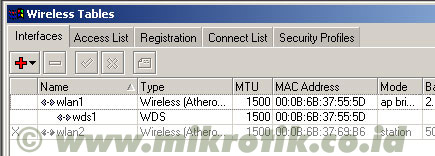
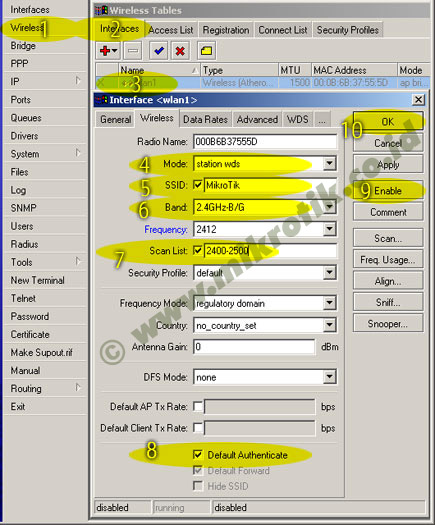
When setting up your access point, you'll want to first connect it to the wired hub, then configure the wireless interface, then the wired interface, and last but not least, configure the security. Configuration of the various network interfaces and access point features is different for every vendor. However, if you can read and follow directions, it's possible to do the installation yourself, even if you don't have prior experience. Just open the access point installation and configuration guide and follow along. If you run into snags call the vendor support line list in your access point manual and ask for help. The types of things you'll need to setup include the radio frequency, the distance between access points, and the access point IP address.

Some of the features you can expect to find in either home or enterprise class access points are listed in this table:

Feature Small Office/Home Office Large Office
IEEE 802.11b compliance
DHCP Server
Network Address Translation
IPSec Pass Through
IAPP
Site Management Tools
WEP (Security)
TKIP (Security)

You can also use what is known as a wireless station instead of an access point. However, wireless stations may take a bit more work to setup, and I won't be talking about them further in this article.

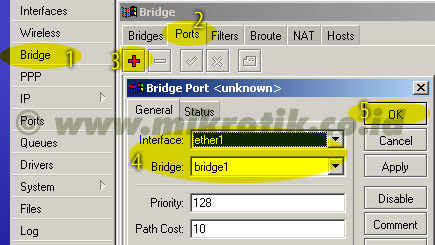
Your access point is the link between the wireless world and the wire. So after you setup the wireless interface, you need to setup up the wired end of the connection — the Ethernet interface. When you configure the Ethernet interface, you will select the speed and duplex particulars. For many access points, however, the speed and duplex settings are self-setting.

Set Up Your Laptop

Since the purpose of a wireless network is mobility, it makes more sense to use a laptop (rather than a desktop) to connect to the WLAN. If the purpose of your WLAN is to avoid shoving wires through walls, it's possible that you may want to connect a desktop system or server to the WLAN. For the purpose of this article, we'll use a laptop to get you up and running. Your laptop will need a wireless network interface PCMCIA card. A wireless network interface card made by any reputable company should suffice. Some of the popular ones of the market today that you might want to consider include:

  • Agere Wireless LAN PC Card
  • Proxim/ORiNOCO Wireless Proxim ORiNOCO 11b Client
  • Cisco Aironet 5GHz 54Mbps Wireless LAN Client
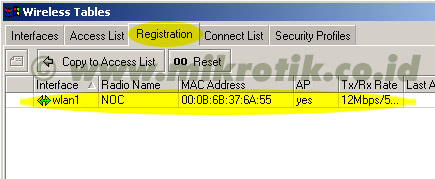
Wireless network interface cards have a 48-bit MAC address associated with them that is completely unique to each card. Installing the wireless PCMCIA card is really no more difficult than installing a regular PCMCIA card. In fact, all the new laptops running Windows operating systems should recognize the card and launch a Setup Wizard that will actually guide you through the installation process by prompting you to make certain decisions along the way. You'll need to install the device driver and enter the SSID associated with your access point.

Setting Up the Security

If you have a low-end access point, your security will be limited to Wired Equivalent Privacy (WEP) and MAC address filters. With a higher end access point, you'll be able to turn on Temporal Key Integrity Protocol (TKIP). WEP is a system for encrypting your data to keep it private from unauthorized users. It was designed to provide privacy equal to what you get on a wired network. TKIP works on top of WEP, offering stronger security than WEP, and increased assurance that your data will not be compromised.

While it has been found that WEP does not offer strong security, it does offer some security, and any security is better than none. Therefore, you should turn WEP on no matter what. You can also layer more security, such as TKIP, on top of it. WEP uses secret keys that get combined with a keystream that then encrypts your data into ciphertext. At the receiving end, a corresponding keystream is used to decrypt the data.

WEP is used to authenticate you to the network and a component of it needs to setup on both the PCMCIA card and on the access point. WEP can be implemented in 40-bit mode or 128-bit mode. As you may suspect, using the 128-bit mode offers more security than the 40-bit mode.

TKIP evolved to solve some of the security problems that WEP does not solve. However, TKIP is relatively new, and many access points and wireless client cards do not support it. If you want to use TKIP, you'll need to be sure you purchase wireless access points and client cards that support it. With WEP, wireless hackers who have the will and time to do so, can obtain the encryption key need to unlock access to the data. In response to the vulnerabilities of WEP, a task group of the IEEE designed TKIP to add stronger security on top of WEP.

TKIP offers new encryption algorithms, and constantly changes the encryption keys making them harder for wireless hackers to capture them. Because the keys are constantly changing, if one of them gets captured, it won't do a hacker much good because by the time they try to use it, the wireless LAN will be using different encryption keys. With TKIP, the encryption keys are also encrypted themselves so you would first need to decrypt the key, before you can use the key to decrypt the network traffic.

MAC address filtering is used to limit what pieces of hardware can access the wireless network. On a large network, filtering the MAC address can be quite an administrative chore and it's worth using cards with sequential MAC addresses to make the job easier. If you want to use sequential MAC addresses, this is something you will need to specify when you make your purchasing decisions. On some wireless PCMCIA cards you can change the MAC address, but on many wireless PCMCIA cards the MAC address is fixed.

For even more security, you can also install a Virtual Private Network (VPN) on your wireless network. Unless you have truly sensitive information, it's probably not worth the time and effort to do this. By using a VPN, you tunnel your wireless data through an IPSec gateway. Using WEP, TKIP, and a VPN together will create a very strong security barrier on your wireless network. Using a VPN can create performance bottlenecks, so don't use one if you don't need one.

Summing It Up

Setting up a secure wireless network is not as hard as it may seem. Anyone with the ability to research wireless product capabilities, and follow the installation instructions can do it. The advantages of not using wires is tremendous, and while some organizations may be reluctant to use wireless networks today, in time they will become ubiquitous and wires will become history.

4 steps to set up your home wireless network

1.

Choose your wireless equipment

The first step is to make sure that you have the equipment you need. As you're looking for products in stores or on the Internet, you might notice that you can choose equipment that supports three different wireless networking technologies: 802.11a, 802.11b, and 802.11g. We recommend 802.11g, because it offers excellent performance and is compatible with almost everything.

Shopping list

Broadband Internet connection

Wireless router

A computer with built-in wireless networking support or a wireless network adapter

A wireless router

The router converts the signals coming across your Internet connection into a wireless broadcast, sort of like a cordless phone base station. Be sure to get a wireless router, and not a wireless access point.

A wireless network adapter

Network adapters wirelessly connect your computer to your wireless router. If you have a newer computer you may already have wireless capabilities built in. If this is the case, then you will not need a wireless network adapter. If you need to purchase an adapter for a desktop computer, buy a USB wireless network adapter. If you have a laptop, buy a PC card-based network adapter. Make sure that you have one adapter for every computer on your network.

Note: To make setup easy, choose a network adapter made by the same vendor that made your wireless router. For example, if you find a good price on a Linksys router, choose a Linksys network adapter to go with it. To make shopping even easier, buy a bundle, such as those available from D-Link, Netgear, Linksys, Microsoft, and Buffalo. If you have a desktop computer, make sure that you have an available USB port to plug the wireless network adapter into. If you don't have any open USB ports, buy a hub to add additional ports.

2.

Connect your wireless router

Since you'll be temporarily disconnected from the Internet, print these instructions before you go any further.

First, locate your cable modem or DSL modem and unplug it to turn it off.

Next, connect your wireless router to your modem. Your modem should stay connected directly to the Internet. Later, after you've hooked everything up, your computer will wirelessly connect to your router, and the router will send communications through your modem to the Internet.

How to go wireless

Next, connect your router to your modem:

Note: The instructions below apply to a Linksys wireless router. The ports on your router may be labeled differently, and the images may look different on your router. Check the documentation that came with your equipment for additional assistance.

If you currently have your computer connected directly to your modem: Unplug the network cable from the back of your computer, and plug it into the port labeled Internet, WAN, or WLAN on the back of your router.

If you do not currently have a computer connected to the Internet: Plug one end of a network cable (included with your router) into your modem, and plug the other end of the network cable into the Internet, WAN, or WLAN port on your wireless router.

If you currently have your computer connected to a router: Unplug the network cable connected to the Internet, WAN, or WLAN port from your current router, and plug this end of the cable into the Internet, WAN, or WLAN port on your wireless router. Then, unplug any other network cables, and plug them into the available ports on your wireless router. You no longer need your original router, because your new wireless router replaces it.

wireless modem lights

Next, plug in and turn on your cable or DSL modem. Wait a few minutes to give it time to connect to the Internet, and then plug in and turn on your wireless router. After a minute, the Internet, WAN, or WLAN light on your wireless router should light up, indicating that it has successfully connected to your modem.


3.

Configure your wireless router

wireless cables

Using the network cable that came with your wireless router, you should temporarily connect your computer to one of the open network ports on your wireless router (any port that isn't labeled Internet, WAN, or WLAN). If you need to, turn your computer on. It should automatically connect to your router.

Next, open Internet Explorer and type in the address to configure your router.

You might be prompted for a password. The address and password you use will vary depending on what type of router you have, so refer to the instructions included with your router.

As a quick reference, this table shows the default addresses, usernames, and passwords for some common router manufacturers.

RouterAddressUsernamePassword

3Com

http://192.168.1.1

admin

admin

D-Link

http://192.168.0.1

admin

*

Linksys

http://192.168.1.1

admin

admin

Microsoft Broadband

http://192.168.2.1

admin

admin

Netgear

http://192.168.0.1

admin

password

Internet Explorer will show your router's configuration page. Most of the default settings should be fine, but you should configure three things:

1.

Your wireless network name, known as the SSID. This name identifies your network. You should choose something unique that none of your neighbors will be using.

2.

Wireless encryption (WEP) or Wi-Fi Protected Access (WPA), which help protect your wireless network. For most routers, you will provide a passphrase that your router uses to generate several keys. Make sure your passphrase is unique and long (you don't need to memorize it).

3.

Your administrative password, which controls your wireless network. Just like any other password, it should not be a word that you can find in the dictionary, and it should be a combination of letters, numbers, and symbols. Be sure you can remember this password, because you'll need it if you ever have to change your router's settings.

The exact steps you follow to configure these settings will vary depending on the type of router you have. After each configuration setting, be sure to click Save Settings, Apply, or OK to save your changes.

Now, you should disconnect the network cable from your computer.

4.

Connect your computers

If your computer does not have wireless network support built in, plug your network adapter into your USB port, and place the antenna on top of your computer (in the case of a desktop computer), or insert the network adapter into an empty PC card slot (in the case of a laptop). Windows XP will automatically detect the new adapter, and may prompt you to insert the CD that came with your adapter. The on-screen instructions will guide you through the configuration process.

Note: The steps below only apply if you're using Windows XP Service Pack 2. If you're running Windows XP and you don't have Service Pack 2 yet, plug your computer into your wireless router and download and install Windows XP Service Pack 2.

Windows XP should show an icon with a notification that says it has found a wireless network.

Windows screen shot

Follow these steps to connect your computer to your wireless network:

1.

Right-click the wireless network icon in the lower-right corner of your screen, and then click View Available Wireless Networks. If you run into any problems, consult the documentation that came with your network adapter. Don't be afraid to call their tech support.

2.

The Wireless Network Connection window should appear and you should see your wireless network listed with the network name you chose. If you don't see your network, click Refresh network list in the upper-left corner. Click your network, and then click Connect in the lower-right corner.

Choose wireless connection

3.

Windows XP prompts you to enter a key. Type the encryption key that you wrote down earlier in both the Network key and Confirm network key boxes, and then click Connect.

4.

Windows XP will show its progress as it connects to your network. After you're connected, you can now close the Wireless Network Connection window. You're done.

Note: If the Wireless Network Connection window continues to show Acquiring Network Address, you may have mistyped the encryption key.

RT/RW NET

Apa itu RT/RW-Net ?

Membangun RT/RW Net adalah suatu konsep dimana beberapa komputer dalam suatu perumahan atau blok dapat saling berhubungan dan dapat berbagi data serta informasi. Konsep lain dari RT/RW Net adalah memberdayakan pemakain internet dimana fasilitas internet tersedia selama 24 jam sehari selama sebulan dimana biaya yang akan dikeluarkan akan murah karena semua biaya pembangunan infrastruktur, operasional dan biaya langganan akan ditanggung bersama.

Konsep RT-RW-Net sebetulnya sama dengan konsep Warnet, pemilik warnet akan membeli atau menyewa pulsa atau bandwith dari penyedia internet / ISP (Internet Service Provider) misalkan Telkom, Indosat atau Indonet, lalu dijual kembali ke pelanggan yang datang menyewa komputer untuk bermain internet baik untuk membuka Email, Chating, Browsing, Main Game dll. Apakah RT/RW Net ini Murah ? Jawabanya adalah iya. Mari kita ambil contoh dengan menyewa komputer di Warnet dengan Rp.3.500 /jam. Asumsikan kita menyewa selama 4 jam perhari maka biaya yang akan dikeluarkan selama sebulan adalah Rp. 420.000. Bandingkan dengan RT/RW net ini dengan asumsi kita berlangganan Speedy untuk besaran bandwith 384Kb yang harganya Rp. 750.000 perbulan. Maka jika jumlah warga yang bergabung misalkan 10 orang maka sebulan warga hanya akan membayar kurang lebih 75.000. Biaya tersebut termasuk sangat murah karena pelanggan akan bebas menggunakan internet selama 24 jam sehari selama sebulan penuh.

Pengertian RT/RW-Net

RT/RW-Net adalah jaringan komputer swadaya masyarakat dalam ruang lingkup RT/RW melalui media kabel atau Wireless 2.4 Ghz dan Hotspot sebagai sarana komunikasi rakyat yang bebas dari undang-undang dan birokrasi pemerintah. Pemanfaatan RT/RW Net ini dapat dikembangkan sebagai forum komunikasi online yang efektif bagi warga untuk saling bertukar informasi, mengemukakan pendapat, melakukan polling ataupun pemilihan ketua RT/RW dan lain-lain yang bebas tanpa dibatasi waktu dan jarak melalui media e-Mail/Chatting/Web portal, disamping fungsi koneksi internet yang menjadi fasilitas utama. Bahkan fasilitas tersebut dapat dikembangkan hingga menjadi media telep

on gratis dengan teknologi VoIP

Tujuan membangun RT/RW-Net

- Turut serta dalam pengembangan internet murah di masyarakat.
- Membangun komunitas yang sadar akan kehadiran teknologi informasi dan internet.
- Sharing informasi dilingkungan RT/RW sehingga masyarakat lebih peduli terhadap lingkungan disekitarnya.

- Mempromosikan setiap kegiatan masyarakat RT/RW ke Internet sehingga komunitas tersebut dapat lebih di kenal dan bisa dijadikan sarana untuk melakukan bisnis internet.

Tujuan lain dari RT/RW Net ini adalah membuat semacam Intranet yang berisi berbagai macam informasi tentang kegiatan yang ada di lingkungan

sekitar. Dengan tersambungnya rumah-rumah ke jaringan Internet secara terus-menerus dan tidak terputus, maka bisnis internet diharapkan akan semakin marak termasuk pemanfaatan internet untuk pembayaran tagihan telpon, listrik, pengecekan Saldo Bank , pemesanan tiket Pesawat dll.


Berapa investasi yang dibutuhkan ?

Untuk pendirian RT/RW Net ini, ada 2 biaya yang akan dikeluarkan yakni biaya investasi awal dan biaya iuran perbulan. Biaya investasi awal adalah biaya yang hanya dikeluarkan sekali yakni biaya untuk pembangunan infrastrukur. Sedangkan biaya iuran bulanan dan biaya operator adalah biaya yang akan dikeluarkan setiap bulan untuk membayar ke penyedia internet dimana besaranya akan tergantung dari besar bandwith atau kapasitas saluran yang akan disewa. Besaran biaya untuk iuran bulanan ini juga tergantung dari banyaknya pelanggan yang tergabung. Untuk koneksi Internet direncakan akan menggunakan jasa layanan Telkom yakni Speedy walau terkadang agak lambat untuk jam – jam tertentu.
Yang termasuk biaya investasi awal adalah biaya untuk pembuatan Netwotk (jaraingan) antar RT/RW dan biaya penyediaan perlengkapan untuk pemakai/warga yang ingin bergabung. Yang termasuk biaya yang akan dikeluarkan oleh calon pelanggan untuk pemenuhan perlengkapan adalah pembelian Komputer/Notebook, Wireless Card dan Antena Penerima

Untuk memulai proyek RT/RW Net harus ada tempat yang akan dijadikan sebagai Central (server) RT/RW-Net yakni tempat untuk mengelola system jaringan atau tempat akan diletakanya server perangkat modem, Billing Server, Access Point dan Switch dan juga sebagai tempat untuk mendistribusikan koneksi internet keseluruh pelanggan /rumah setiap anggota.
Untuk mendistribusikan koneksi internet keseluruh pelanggan maka ada dua cara yang umunya ditempuh yakni dengan menggunakan sistem kabel (UTP) dan sistem Wireless (Gelombang Radio). Dengan berbagai pertimbangan termasuk letak rumah para pelanggan yang tersebar maka sistem kabel tidak akan efisien jika harus menarik satu kabel kesetiap pelanggan/rumah karena jarak serta kontur tanah yang tidak rata. Dengan pertimbangan efesiensi dan efektifitas termasuk kemudahan maintenance maka kami usulkan untuk menggunakan system Wireless ketika akan mendistribusikan koneksi internet kesetiap rumah termasuk pembentukan sistem jaringan komputer atau Local Area Network (LAN).

Peralatan yang dibutuhkan (Calon Pelanggan)

Setiap warga yang ingin bergabung dalam komunitas RT/RW net ini maka peralatan yang dibutuhkan adalah :
- PC Desktop/Notebook
- Kartu Wireless ( untuk komputer/Notebook yang belum memilki Card Wireless/WiFi)
- Antena Yagi atau Wajan Bolik

Semua biaya untuk perlengkapan adalah biaya yang dibutuhkan oleh warga jika ingin bergabung dengan RT/RW. Jenis PC yang cocok buat warga, tipe wirless card yang bagus dan berkualitas serta jenis antena penerima yang akan dipasang disetiap rumah.

Estimasi Biaya Pembangunan RT/RW-Net (Hardware & Tower/Antena)

Tempat yang menjadi server akan dibangun sebuah tower/antena dengan ketinggian sekitar 25 meter sehingga bisa menjangkau seluruh rumah di Blok A termasuk rumah yang ada di Blok D. Dari tower ini akan dipasang sebuah antena dan Access Point sehingga frekuensi radio atau sinyal dapat ditangkap oleh semua pelanggan. perkiraan kebutuhan dana untuk memenuhi kebutuhan pendirian RT/RW-Net adalah sbb :

style=”text-align: center; font-weight: bold; font-family: Arial;”>
Jenis
Peralatan
style=”text-align: center; font-weight: bold; font-family: Arial;”>Harga Keterangan
PC
Server (OS Linux)
2.500.000,-
style=”font-size: 9pt; font-family: Arial;”>Pentium IV Dual
Core,
512MB DDR2, 80GB HDD SATA,
52x CD-ROM, VGA Integrated 128MB (shared),
Audio,
NIC onboard, 15 inch CRT Monitor

href=”http://www.billinghotspot.com” target=”_blank”>Billing
WiFi (RT/RW-Net)
2.000.000,-

href=”http://www.mikrotik.com” target=”_blank”>RouterBoard
RB 133
1.100.000,- OS
Level 4
Power
Over Ethernet
(PPOE)
100.000,-
Outdoor
Box TI-BOX
135.000,- 15×25x10
Adaptor
20 V 4.5 A
125.000,-
Antenna
Rubberduct 9
DB
125.000,-
MiniPCI
WLM 54G P23
+ PIGTAIL
375.000,-
Switch
Hub
120.000,- 5
Port
10/100
Connector
RJ45
70.000,- 1
Box
Konstruksi
Antenna + Kabel Grounding +/- 35m
9.500.000,- Triangle
5 stick, 25 Meter (biasanya sudah termasuk biaya
pemasangan dan Intalasi)

style=”font-size: 10pt; font-family: Arial;”>Total Biaya
Keseluruhan
16.150.000,-

Dari tabel diatas maka biaya untuk pembangunan RT/RW-Net adalah Rp. 16.150.000,- Biaya tersebut adalah biaya yang akan ditanggung bersama oleh warga yang ingin bergabung dengan RT/RW Net. Semakin banyak warga yang bergabung maka semakin murah biaya yang akan dikeluarkan untuk pembangunan ini